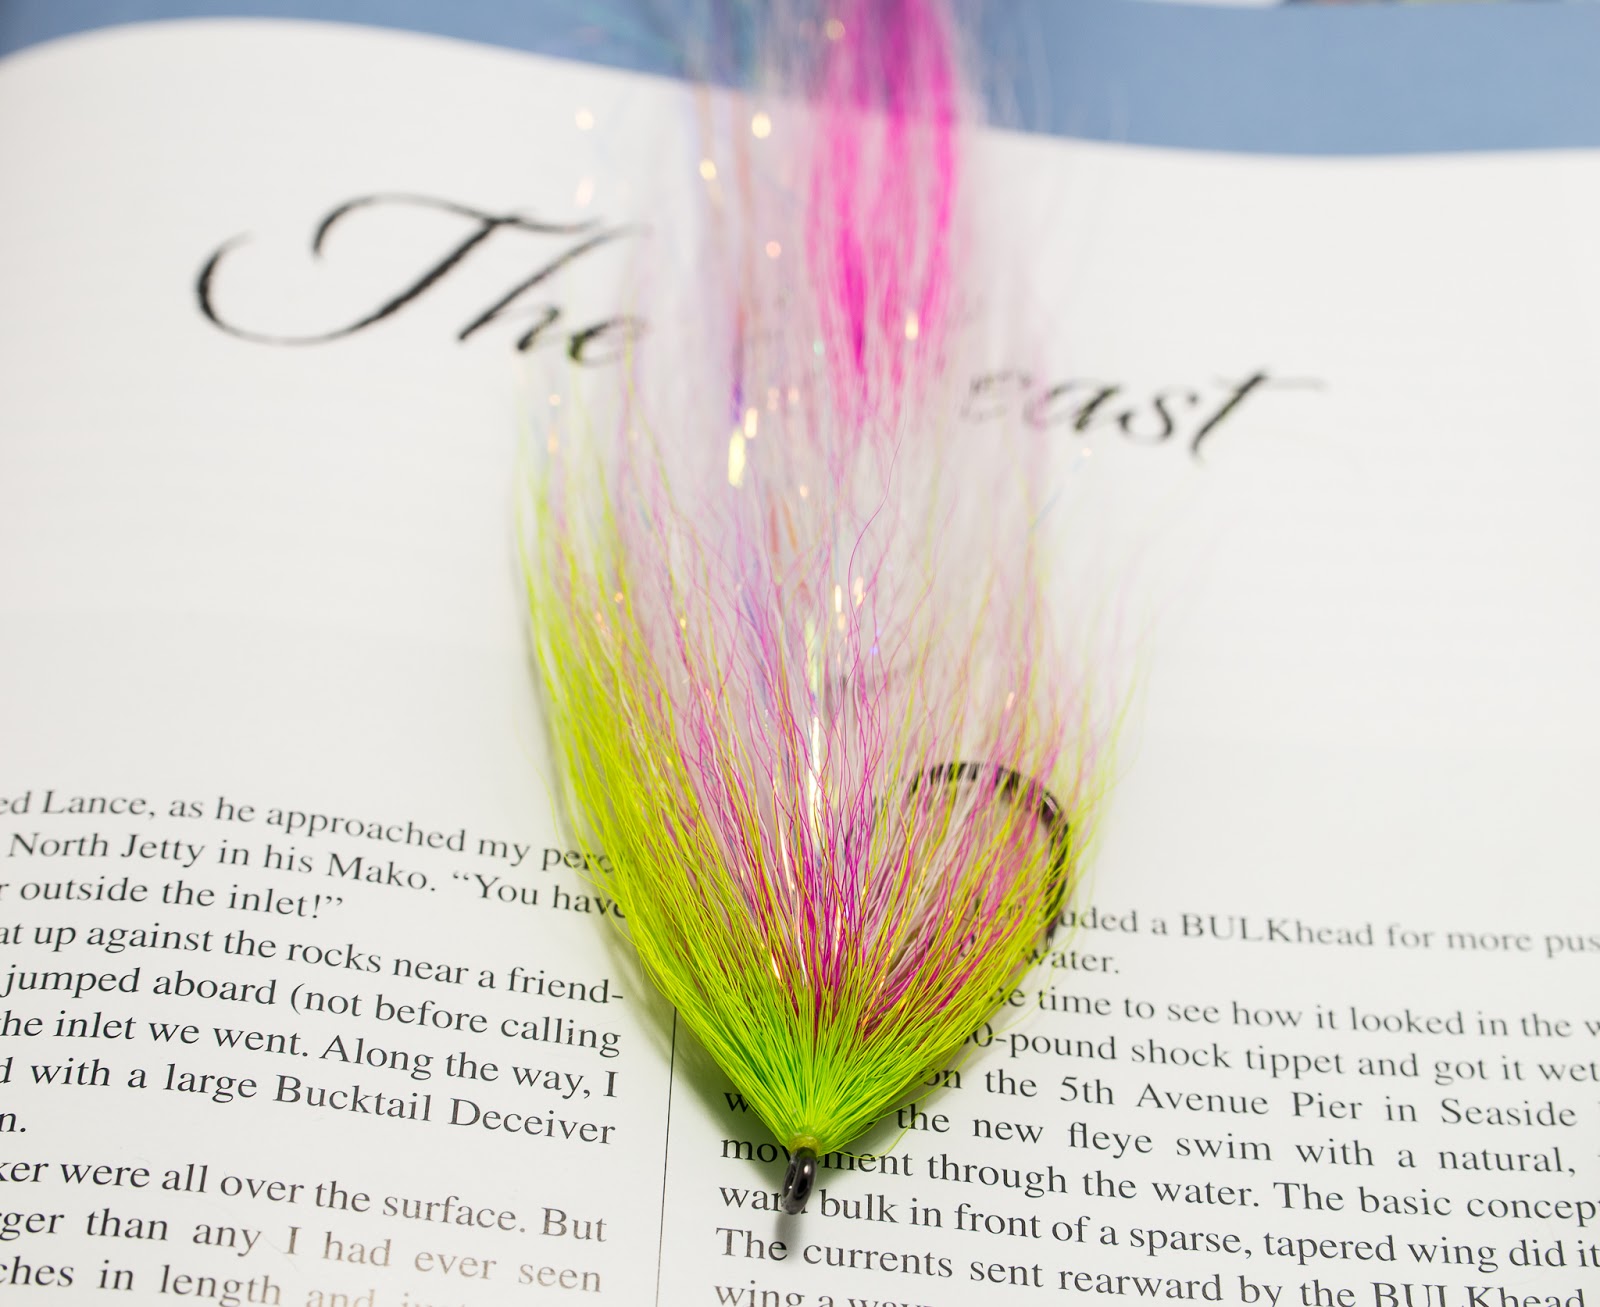
The Beast

Howdy folks! It's been a while since I last wrote here in my english blog. Trying to make a comeback so stay tuned.
First up is some thoughts about Bob Popovics' Beast fly and how you can modify it to suit your own needs and style of tying and fishing.
I started hearing rumors and the odd picture of the Beast about three years ago. The Beast is a Hollow tied bucktail deceiver with an extended body to add length and profile behind the hook. It is a specialty fly when you need a fly that's big and easy to cast. Nothing casts like a well tied Beast. The original way is to use a thick mono to tie the extension on and then attach it to the hook. You will find specific instructions on how to tie the Beast and some additional background info on Bob's new book about the Beast. I highly recommend you buy it.
 |
| The Book. |
Bob told me that when he first started tying the Beasts he tied them big and really full. They ended up being pretty nasty to cast. Since then the Beast has evolved. Less material and wider gaps between the ties. This has made the Beast the ultimate big fly design which is easy to cast and has lots of movement. It has also become much more enjoyable to tie and does not consume so much material.
 |
| Bob's book is a classic. Honestly the best fly tying book ever. |
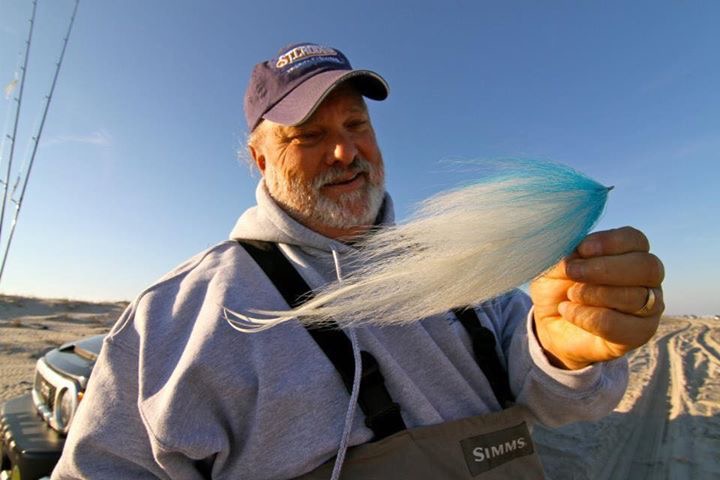 |
| Sensei Bob with his Beast. |
 |
| Bob's early Beasts had a lot of material. |
 |
| The new ones are sparse and nice to cast. |
After tying it the original way, I started experimenting on alternative ways to tie the extension as the original way takes some time to get used to. I do still tie it the original way on occasion. I will now go through some pros and cons about each way and give a detailed SBS on how to tie one version of the Beast with a tube extension.
The original
The original way of tying the extension takes a special touch to tie them right. I won't go into much detail on how to tie it as Bob's book explains it so much better than I can. I use a mono or fluorocarbon line that has a diameter of 0,80-1 mm. You can get away with a 0,70 mm too but I prefer something thicker. I prefer to spin the bobbin and don't use a vise at all when doing the extension on the mono.
+ The taper. I think the original way makes it very easy to tie a perfect, uniform taper on your Beast. You know the ones that master tyer Andrew drops out of his vise all the time.
+ The mono adds zero weight to the fly and can not foul.
+ As the mono is very stiff it will let the materials only to move and pulse in the water. It will also make the fly to swim very straight.
+ It is easier to use sparse ties of bucktail on the mono extension than it is on the other options (especially the tube version) as the diameter of the mono is relatively thin.
+ I think the original is the best way to make super big Beasts that are 12" or longer.
- The tying technique takes some time to get used to and when you do get the hang of it, it still takes quite a bit of time to tie the extension.
- Getting the mono to be straight takes some preparation.
 |
| This is a small Beast at just 6" tied the original way. The extension is there just for the profile. |
 |
 |
| This one is a long extension for a big Beast. |
 |
 |
| Big whopper. These Mega big Beasts are best tied the Original way. |
 |
| Andrew Warshawer ties the prettiest Beast in the business. The taper is always perfect and the quality of the bucktail used on these is just presidential. I am a big fan. |
Shank version
The extension can be tied on a shank too. You can position the hook at the back of the shank or the shank at the back of the hook. I personally prefer the shank behind the hook as it's not that nice to tie it the other way around. There are many types of shanks available in the market. I prefer to use the lightest possible shank around. If you use the hook at the back you can just attach the hook straight to the shank. If you're using the shank as an extension, you have to attach it to the hook with wire, fluoro or mono. You can also use multiple shanks if you want to and make a Game Changer out of your Beast.
+ The platform of the shank is similar to tie on than if you are just tying a fly on a regular hook.
+ The added weight sinks the fly quicker than the other ways.
+ You can get that tail wiggle action on these if you attach the shank with a loop.
- Even though the platform of the shank is very similar to a hook, it's still different as the wire (or double wire) of the shank is flat and not round as a hook wire. This may cause some problems in the hollow tying process.
- The added weight will make the fly harder to cast.
- Did I already mention the added weight? The bigger and longer the shank is, the more it adds weight to the fly.
- If tying the hook at the back of the shank, the first two ties are very awkward to tie.
 |
| I tie most of my shank versions this way with the shank at the back. |
 |
| This one is made with two shanks. A small one and a medium one. |

 |
| A different type of vise would suit this way better with the hook at the back. |

Tube extension
The tube version was born from frustration of tying the original version. I talked with my fishing buddy Pasi about how weird it feels to tie the extension on mono and even though we just loved the design and finished product, the process felt too much to handle. Pasi then suggested that I should tie the extension on a tube, as I am tying on tubes regularly anyway. After a lot of different versions I started hitting this right. I tried many different ways to attach the tube to the hook and have pretty much settled on mono or fluoro that range from 0,60-0,70 mm in diameter (around 40-45 lb for my american friends) or a 35 lb plastic coated wire. The attachment is simple and quick to make. I go through the tube with the line, make a loop knot at the end, cut the loop and pull the knot tight in to the tube. It has never failed me so I just stopped looking for alternative ways. The diameter of the line that I have settled on lets the extension move after the stop, but is thick enough so it does not foul on a bad cast. The tube of choice for me is the M size from Eumer, but the brand is really not that important. Just make sure you don't use a tube that's too thick. An outer diameter of around 3 mm is the thickest you should use. A really thick tube will float the rear too much and makes tying the hollow ties of bucktail more difficult. If you feel that the tube floats the rear too much, you can add a drop of UV resin between the hollow ties. The tube version is one that I tie the most and fish the most. It works really really well as a Pike fly.
+ The tube platform is very natural to tie on for me. It really makes tying a Beast quick and easy. For me that is.
+ I just love the natural swaying movement that the tube gives the fly when you stop the strip.
+ The tube adds almost zero weight to the fly.
+ Did I already say that it's fast?
+/- Tying the extension on a tube makes it look less translucent and more opaque than if you're tying on mono.
- You can't really make a super long extension from a tube. First of all it is really hard to tie on a really long tube and second, it will start to effect the balance of the fly if the tube is too long.
- You need to take the few extra steps to attach the tube to the hook properly.
 |
| I have caught most of my biggest Pikes with the tube Beast. I do give more credit to luck than the fly though, but I always feel confident that the Beast will catch when I tie it on. |
 |
| You can adjust the length of the line that you use to attach the tube to the hook to position the tube. This will effect the flies general appearance. |

 |
| This one was a real quick Beast. 25 min from start to finish. Not that it's a competition or anything like that. Tying only one color of bucktail on one tie makes the tying really fast. Also the fact that this one has no eyes or any "extras" makes the fly a lot faster to tie. |


How to tie a tube Beast
 |
| Start by inserting your tube to your tube needle and wrapping up your thread on it. Then tie some bucktail 360 around the tube. |
 |
| Add thin and long hackles on both sides of the tail. |
 |
| Move your thread forward and hollow tie some bucktail. |
 |
| Push the hair back and start working on your thread dam in front of the bucktail. |
 |
| Add some flash in front. SW angel hair or Sybai Saltwater flash are my favorite flash to use on these. |
 |
| Move your thread forward. It's good to leave at least 7 mm of room between the ties. Hollow tie some more bucktail. |

 |
| Move your thread again and tie one more hollow tie of bucktail. |

 |
| Add some flash to the end of the tube. |
 |
| Cut the excess tube off and use a lighter to melt the end a bit. This will make it look smoother and also act as an blocker so that the knot on the attachment line does not pass through the tube. |
 |
| Pass your line in from the front of the tube and through it. Make a loop knot at the end of the line and cut the loop off of it. |
 |
| Pull the knot tight in to the tube.There you go. |
 |
| Use pliers to flatten down the line. This will make it easier to attach to the hook. |
 |
| Attach the line on the hook. At this point you can adjust the gap between the hook and the extension. |
 |
| Make sure you have a good base of thread under the attachment and use lots of super glue to secure the connection. |
 |
| Hollow tie some bucktail at the back of the hook. If you leave a bigger gap between the hook and the extension, it is good to tie one normal tie of bucktail at this point to "bridge the gap". Then follow it by a hollow tie to get the profile right again. |

 |
| Move your thread forward again and start another hollow tie. Normally I tighten up the gaps between ties when I get to the hook by a few millimeters. This will give the front more bulk and it balances the fly. |

 |
| Add your flash again in front of this tie. |
 |
| Another hollow tie. |
 |
| Hollow tie some gray bucktail on top and orange at the bottom. |
 |
| Push back and build your dam. |
 |
| Add one more hollow tie of the same colors. |
 |
| Finalize the fly with a pair of synthetic JC eyes from Deer Creek. They are so cool! |
 |
| Give the fly a wash and your done. Go fishing! |
Final thoughts about the Beast
I'm sure that by now everyone knows that I just love this pattern. They are so fun to tie and really fun to fish with. I would say that I tie 65% of my Beasts on tube, 25% on mono and the rest with shanks. The most important thing though is to find your favorite way of making them and understanding the fundamentals of this pattern. That's why I started writing this article. There are a few pointers that I would like to add to close up this article.
- Practice your hollow tying on a "normal" Hollow fly before advancing to the Beast. You can get some really good instructions on it from Bob's new book.
- Control the gaps, the amount of material and flare/angle of the hollow ties. If you feel that it's off, then re-do it. Better to spend some extra time on each step than to feel bad about the finished product.
- Remember that many sparse ties make a pretty full fly at the end, but too sparse is too sparse. Practice makes perfect.
- Try to match the hook to the size of the Beast that you're tying. Too small a hook and it won't keel the fly properly. Too big a hook and it will make the Beast harder to cast and unbalanced.
A big thank you to Bob Popovics for sharing your knowledge and pictures. A warm thank you to Andrew Warshawer as well for all the help over the years and sharing your pictures with me.

Tight lines!!


Hope you're using em up on the Cape! Go Jari!
ReplyDeleteJack
I have read your article very attentievely really this is very informative article.Just read your article. Good one. I liked it. Keep going. you are a best writer your site is very useful and informative thanks for sharing!
ReplyDeleteMy blog: best saltwater spinning reel